Once you know how to build a backyard cricket pitch, you are not dealing with just a friendly grass patch but a professional training field that can take batting, bowling, and weather-teased spins. Making a specialized batting and bowling track involves knowing just the right amount of planning, structural levels, and civil base groundwork. Initially, you’ve got to assess your lawn’s design in order to learn to make a cricket ground at home so as not to interfere with the natural off-site water flow beneath your home’s surface. Want to pair your new turf with modern training tech? Check out how you can use chttps://cricproz.com/ai-virtual-reality-cricket-2026/ to maximize your indoor and outdoor net sessions.
This all-inclusive operations manifesto will guide you through all the engineering aspects of excavation dynamics and turf infusion engineering. For parents of young athletes, club players, or anyone seeking to refine their skills at home, learning the art of how to build a backyard cricket pitch construction in your yard may expand the dimensions of home recreation for years to come. And now, by bringing home your weekend project, the step-by-step approach of how to build a backyard cricket pitch provides you with technical perfection—enough knowledge to understand how to build a backyard cricket pitch that allows you to have the professional stadium experience.
Table of Contents
1. THE STRATEGIC PLANNING AND LEGAL CHECKLIST
Prior to the commencement of excavation, a full understanding of structural and legal aspects of your property and how to build a backyard cricket pitch must be obtained. Omitting this foundational step may cause property damage, neighborhood disputes, or even city fines that might stop your DIY project in its tracks.
SITE SELECTION AND ORIENTATION BOUNDARIES
The usability of your play strip throughout the day is determined by its location. The north-south orientation of how to build a backyard cricket pitch is an accepted norm in cricket ground engineering for how to build a backyard cricket pitch. This configuration guarantees that neither the batsman facing a bowler nor the bowler beginning his run-up has to look straight into the low sun in early morning or late afternoon sessions of practice. To check how professional pitch dimensions and alignments are structured globally, you can read the official regulations in the MCC Laws of Cricket.
Also consider the natural geography surrounding the site you’ve selected. Don’t set the lane up directly under towering, mature trees. Tree roots will constantly be pushing upwards, permanently distorting your aggregate base and ruining your flat playing field. Leaves and sap falling from trees will stain your artificial turf and block the permeable backing, which causes mold growth and deterioration of the fibers.
2. PUBLIC UTILITIES AND DRAINAGE CHARGES
Locate all underground utilities prior to excavation and learn how to build a backyard cricket pitch lane. Contact your local utility protection service (e.g., 811 or Dial Before You Dig) to locate any buried electrical conduits, gas mains, water lines, etc. Cutting off a major utility line unintentionally may cause fatal accidents and highly expensive liability claims. If you want to understand how shifting atmospheric conditions alter surface playability, read our detailed analysis on https://cricproz.com/weather-impact-pitch-fantasy-cricket/ to see how moisture levels affect ball behavior.
While you’re at it, also check the flow of surface water over your yard. If the site you have selected is located in a naturally low area with rainwater running into it, you will be adding a subsurface French drain system. What to know about how to build a backyard cricket pitch base. A cricket pitch in the yard should never be a retention pond because a proper crossfall drainage system maintains the sub-base uniformly, and the playing surface dries up quickly after a torrential rainfall.
LOCAL COUNCIL PERMITS & HOA REGULATIONS
Don’t assume that backyard sports equipment is exempt from local building regulations. Review your Homeowners Association (HOA) and city rules on the following:
How deep you are allowed to dig without needing engineered retaining structures. Setback requirements from property lines (how close the pitch and/or the surrounding netting can be to a neighbor’s fence). Cutting off a major utility line unintentionally may cause fatal accidents and highly expensive liability claims, so it is crucial to submit a request through a certified damage prevention portal like Call 811 Safe Digging before starting your excavation.
Height restrictions for permanent or temporary chain-link and fabric safety cages.
Getting written permission or formal permits ahead of time to buy materials will save you from removal or costly alterations halfway through building.
3. OVERALL, TOOLS & MATERIALS MATRIX:
You want to gather the suitable tools and materials on how to build a backyard cricket pitch well in advance to carry out this heavy DIY cricket ground setup quickly. The use of wrong materials or skimping on sub-base stone will lead to an uneven bounce and short life for your turf.
ESTIMATIONS OF RAW MATERIALS AND AGGREGATES
The secret to structural durability is totally beneath the artificial grass. To build a synthetic pitch for your kids in your how to build a backyard cricket pitch guide, get these supplies for a regular half-pitch (10 to 12 meters long, 2.5 to 2.8 meters wide):
Geotextile Fabric Membranes: Nonwoven landscape fabric to separate natural soil from aggregate stone layers in your patio base, inhibit weed growth, and stop subsoil from your aggregates.
Coarse Road Base (Crushed Rock/3/4-Minus Aggregate): Serves as your main building block for how to build a backyard cricket pitch. It must be applied to a compacted thickness of a minimum of 75 mm for withstanding jarring pedestrian traffic and bowling loads.
Crusher Dust (Granite Fines/Screenings): A layer of fine 25 mm dust is run over the coarse rock to fill up small gaps and to provide a concrete-like base ahead of turf installation.
Perimeter Timber/Composite Edging: I suggest heavy-duty treated structural timbers ($100\text{mm} \times 50\text{mm}$) or recycled plastic compost planks to create a perimeter around your entire garden and give that to the gravel for extra security.
Turf Adhesive and Jointing Tape: Professional-quality all-weather polyurethane synthetic grass adhesive with heavy-duty geotextile seaming tape for seaming large rolls of turf.
4. CRITERIA OF SELECTION FOR TURF IN FIELD OF CRICKET
Standard residential landscaping grass cannot be used for how to build a backyard cricket pitch. Turf grass has long, soft blades fashioned to simulate the look and feel of a real lawn; if you drop a cricket ball on it, the ball will just thud and die without getting any air. How to build a backyard cricket pitch isn’t about taking shortcuts—it’s about investing the time to buy a product made to take pummeling from the high velocity of a genuine cricket ball and still generate reliable, true ball turn. To track how well your ball behaves on the new synthetic turf, you can analyze your shots using data from our comprehensive https://cricproz.com/smart-bat-sensors-2026/.
PILE HEIGHT AND TEXTURE DESIGN
An ultra-dense, short-pile carpet of between 9 mm and 15 mm is recommended for consistent ball bounce and spin reaction. The pile is to be made of texturized, directional, fibrillated, or monofilament yarn. How to build a backyard cricket pitch. This high-density tuft is what replicates the compacted natural clay wickets. A short and vertical pile means the ball will keep its speed after hitting the ground, and the batsman has a reasonable reaction time to play the balls, which is the same as in a professional club.
5. TUFT DENSITY AND TOTAL CARPET WEIGHT
Review the synthetic turf specs sheet from your manufacturer in detail. High-quality cricket carpets have a high tuft density in the region of 40,000 to 50,000 stitches per square meter. How to build a backyard cricket pitch. Much denser yarn prevents fibers from permanently flattening under the fast bowler’s heavy landing stride. How to build a backyard cricket pitch.
POLYURETHANE BACKING AND UV PROTECTION
The backing fabric locks the woven coils of synthetic yarn in place. How to build a backyard cricket pitch. Grandpa also wants the long-term durability of the high-quality polyurethane (PU) backing, not the cheap latex backing. Polyurethane doesn’t shrink, degrade, or swell when subjected to prolonged moisture, which makes it suitable for use in contact with an aggregate base.
Also check that the “How to Build a Backyard Cricket Pitch” product is 100% UV weather-stable. Because your training lane will be under the sun all year round, unprotected plastic fibers will become brittle, fade, and crumble after a couple seasons. UV-treated yarns maintain their elasticity and depth of color for more than 10 years.
6. PERFECT SPECIFICATIONS AND MEASUREMENTS
Before you start digging with a spade, decide if you want your yard fitted with a full-length international lane or a short, space-saving training strip. How to build a backyard cricket pitch. The decision on how to build a backyard cricket pitch that truly suits your lifestyle comes down to this one option, as it affects your raw material outlays, the overall dig labor you need to do, and how much of your lawn you will be using. If you are setting up a shorter training lane, pairing it with the right equipment is key. Read our expert review on https://cricproz.com/budget-bowling-machines-2026/ to find the perfect setup for your yard.
UPRD STANDARD INTERNATIONAL SIZES
A full-length cricket wicket is exactly 22 yards (20.12 meters) from stump to stump. But you can’t just make a space 22 yards long and call it a day. You have to consider the bowler’s release, how to build a backyard cricket pitch stride (which is a minimum of 3 to 5 meters in distance behind the bowling crease), and a safe level of batting (approximately 3 to 4 meters behind the batting crease). Once your net setup is ready, you can easily correct your stance and swing by following our guide on https://cricproz.com/how-to-use-ai-video-analysis-batting/.
Therefore, you need a straight, uninterrupted run of approximately 27 to 29 meters for a complete home practice set-up. For the width, something around 2.5 to 3.0 meters will be perfect. This also allows you to run late and whip away even those wide deliveries without ever wondering if the ball will spin away into the grass out there.
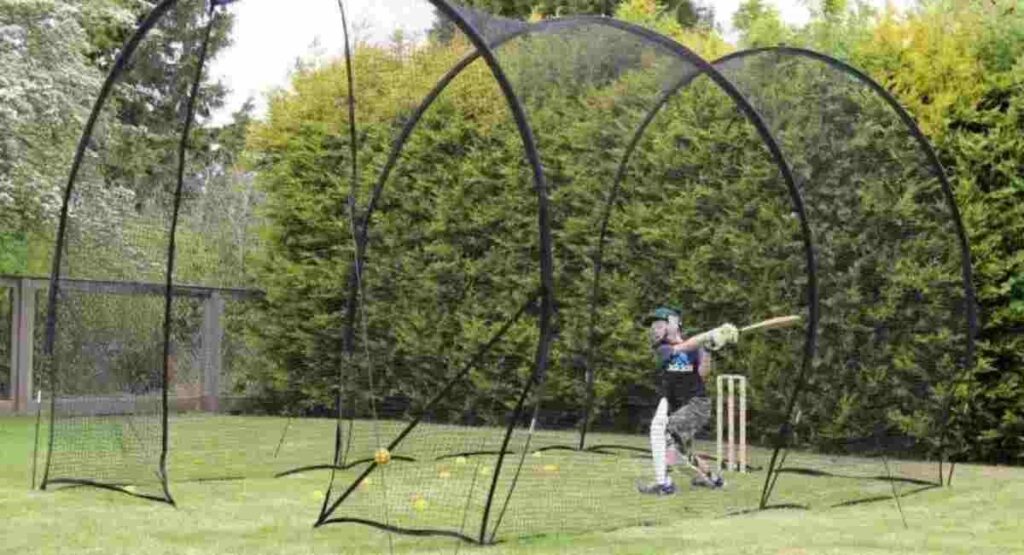
7. PERIMETER FASTENING AND INFILL LOGISTICS
A good bonding of the edges will keep the “how to build a backyard cricket pitch” carpet from curling up and tripping players as they run or dive. Having a dedicated batting strip allows you to sharpen your movements. Make full use of your new space with these essential https://cricproz.com/cricket-footwork-drills-home-guide/.
FASTENING THE BORDERS TO THE TIMBER FRAME
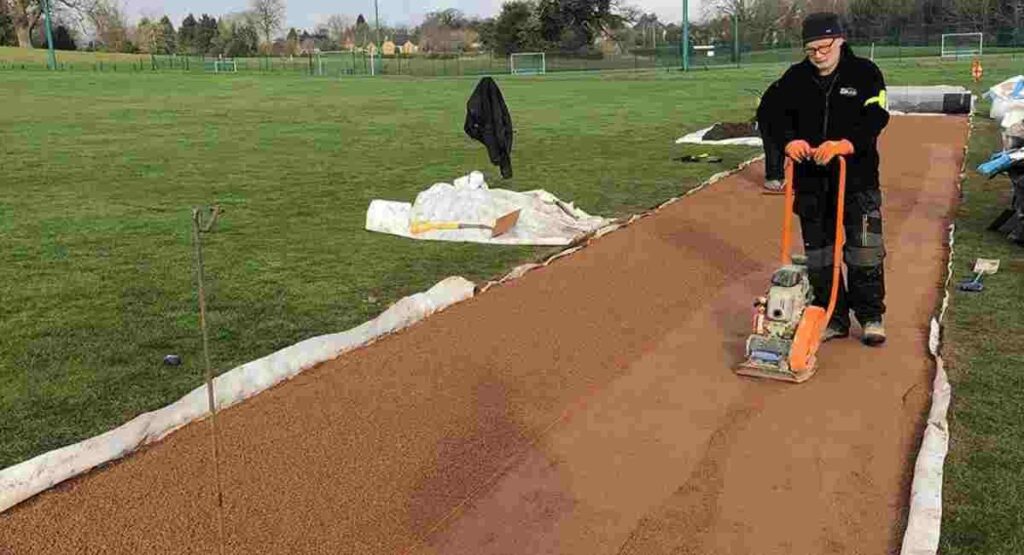
Stretch your loose synthetic turf tightly across your frame to take out any last slack on how to build a backyard cricket pitch. Penetrate 50mm galvanized countersunk structural screws or heavy-duty pneumatic staples around the perimeter of the turf into the wooden base.
Fasten every 150 mm along the short batting and bowling ends; these are where players slide and dig their heels in. You could get away with a 300mm spacing along the side borders and how to build a backyard cricket pitch. Make sure the fasteners are slightly embedded in the backing so they can be securely covered by the short grass blades.
SAND INFILL DISTRIBUTION
Depending on the type of cricket how to build a backyard cricket pitch carpet you pick, you might need to install a thin covering of kiln-dried silica sand infill. Infill is added to supply ballast weight to hold the carpet securely pinned to the ground, support the yarn fibers, shield the backing from damage of the UV kind, and shock-absorb certainly way too much landing bowlers.
CONCLUSION:
Constructing a high-end practice lane is certainly a labor of love, but the paybacks over time are well worth the weekend sweat. In this way, you’re not relying on inconsistent bounces, rain pooling water, and moving turf. Real success, however, is achieved through the very unseen minutiae: having a high-density, cricket-specific synthetic carpet, securing it with a robust timber ring, and compressing a concrete-hard aggregate base mechanically.
Once you have adjusted your parameters and have swept the final layer of silica sand in place, you will have a durable, low-maintenance facility that rivals the playability of a professional stadium. With the right equipment, the right measurements, and this comprehensive DIY guide, you now have all you need to create a cricket pitch in your own back yard that will take your game higher, bring the whole family together, and stand up to years of furious workouts in plain view of your backdoor.
Frequently Asked Questions (FAQs)
Q1. Which should be the best base materials when building a backyard cricket pitch?
Answer: There are two different layers needed for the best foundation for how to build a backyard cricket pitch. A 75 mm layer of coarse road base (crushed rock mixed with fine stone dust) is laid first as a base on which the asphalt will rest. This is sealed with a fine 25mm layer of crusher dust or granite dust that fills any small holes and is screeded to a perfectly flat, concrete-like surface prior to laying the synthetic turf.
Q2. Can I use standard landscaping artificial grass for a cricket pitch?
Answer: No, Not All Turf Is Created Equal or Suitable. The “how to build a backyard cricket pitch” ones for landscaping have long, soft blades meant to simulate a nice lawn, and that will make the cricket ball thud and lose a lot of its bounce when it hits. Learning how to construct a backyard cricket pitch requires that you buy a unique, short, extra-dense-pile carpet (9 mm – 15 mm), which is designed to handle sufficient impacts at high pace and maintain a true ball bounce.
Q3. How deep do I dig when I’m planning on building a backyard cricket pitch?
Answer: You need to dig out the entire marked perimeter to a depth of 100mm (roughly 4 inches). This gives you an encased 75 mm of coarse aggregate road base layer and 25 mm of fine crusher dust topping layer, with the how to build a backyard cricket pitch final artificial turf surface level with your lawn.
Q4. What should be the size of a cricket lane for practicing at home?
Answer: For those with a huge yard, go for the full international-length rig. To be able to accommodate the actual 22-yard wicket, the bowler’s run-up and release stride, and a safe batting crease, you will require a straight run of between 27 and 29 meters (29.5 and 31.9 yards).
Q5. What is the importance of the direction/orientation of pitch?
Answer: It’s the sun. The golden rule when you’re laying out a pitch is to orient it roughly along a north-south line. This prevents the batsman standing at the crease from playing the ball, as well as the bowler charging in to deliver this blindness-inducing rising or setting sun in those perfect early-morning or late-evening practice sessions.
Q6. With or without a boundary frame—do I really need one, and how do I get it?
Answer: Yes, the frame is what keeps it together. Think of the how to build a backyard cricket pitch border that runs around the perimeter as a structural retaining wall; no, it’s not too dramatic; it literally prevents the packed gravel in your foundation from creeping outward into your lawn over time, and the edges of your pitch are beginning to cave in.
Q7. How do I securely join two rolls of artificial grass together?
Answer: When joining synthetic rolls, cut away the non-tufted factory edge from the backing with a razor-carpet knife. Place a heavyweight geotextile seaming tape under the seam line, spread an all-weather polyurethane turf adhesive on top with a notched trowel, and bring the turf edges together, allowing a small 1 mm gap so it doesn’t form a raised ridge.
Q8. Do you need sand on a synthetic backyard wicket?
Answer: Yes, most of the good quality cricket carpet does require a light coat of kiln-dried silica sand infill (approximately 2 kg to 5 kg per square meter). The sand is used as a structural ballast to keep the carpet pinned flat; it props up the yarn fibers, it protects the backing from UV degradation, and it safely absorbs the high-impact landing shock of fast bowlers.
Q9. How do I maintain the surface once I figure out how to build a backyard cricket pitch?
Answer: Maintenance is not nearly as hard as natural clay wickets. Blow or sweep with a stiff outdoor broom every week to remove leaves, twigs, and pieces of grass that can decompose and clog the porous backing. Steel yard rakes should not be used on the turf, as the prongs can rip the woven seams.
Q10. How do I repair the dips or hollows that develop in the bowler’s landing crease?
Answer: Very intense bowling actions can develop a small depression in the sub-base at the crease line (although not everybody wants to call it playing on a branch of cricket). To do this, pull up the front edge screws of the carpet, fill the low area with a little scoop of fine crusher dust, compact it with a hand tamper, and reattach the synthetic turf firmly to the wood frame.